
First, let’s get something straight: I’m not crafty. While I sometimes aspire to be the girl who crafts bunting and giant pom-poms for parties, and knits homemade baby gifts for people’s showers — I’m not. I don’t even know how to knit. I can re-sew a button, and that’s it.
I lack patience. I get frustrated easily. I don’t love having paint under my nails. I find threading a needle to be one of the most problematic tasks in the world. I wasn’t exactly made to be Martha Stewart.
Despite this, right before I started law school, my sister and I inherited two old wooden dressers from our parents, which had been stained and varnished. (Varnished repeatedly. Our dad LOVES varnish.) We decided that we would strip and paint them — a genius idea! Little did we know, stripping 1000 coats of varnish off of a 30 year old dresser was an absolute nightmare. And though the dressers eventually got painted and look fine, ever since then, I’ve had zero interest in “DIYing” anything.
Until now.
Some of you may know that KC and I moved into a new place at the end of last year. And frankly, our little abode is chock-full of charm and adorable details. However, there was one room that I wasn’t so over-the-moon about — our dining room:
 The walls were a kind of dingy off-white, and the rest of the room was BROWN. Brown trim, brown floors, brown closet doors, and of course all of our brown furniture found a home in there — our brown bar cabinet, and brown table and chairs.
We bought a new dining room table to better fill the space, but it was also brown. Not only that, but we didn’t have 6 matching chairs to put around our new purchase, so we had this lovely congregation of unmatched brown wood.
 That’s our new dining room table + 4 of the unmatched chairs.
After seeing the brown on brown on brown scheme which was the dining room, I had an idea — let’s paint the dining room chairs! I had 3 pairs of unmatched chairs — I could just paint them all the same color for a shabby-chic vibe and splash of color. Genius!
I informed KC of my plan. I believe my actual text to him was: “This is going to be awful, but we’re going to paint the dining room chairs. Don’t hate me.” (I think his response was, “Fine.” with an implied SIGH accompanying it.)
So I did some research on how to paint finished furniture. Surely there had to be a better way than trying to fully strip the chairs and then just painting over them (like Alexis and I did to the aforementioned dressers). Thanks to the genius that is Pinterest, I was able to find some links to posts written by actual DIYers who had painted over their finished furniture. Apparently, the primer you use makes all the difference. (Guess what people? It’s true. I’m a total believer.)
Here’s what we used for our project:
- 6 chairs (2 unfininshed IKEA chairs, 2 super old chairs from a Target table set (seen here), 2 chairs that were my parents and handed down, so I have no clue where they were purchased)
- Medium-grit sandpaper (120 I think?)
- Glidden Gripper Grey Primer for dark/vivid colors (also comes in white for light/non-vivid colors. Also, it’s amazing.)
- Behr Semi-Gloss Indoor Enamel Paint in pepper grass
- Paint brushes
- Drop cloth
- Rag
The first step is sanding down the finished chairs to rough up the surface so that the primer will adhere to it. I read competing articles on this — some said to take the finish off the chairs completely, others said to give it a quick once-over just so that the surface isn’t smooth. Based on our experience, the more finish your piece of furniture has on it, the more you’ll want to sand it down to rough it up. The Target chairs had the thickest finish, and required the most amount of sanding. The IKEA chairs were unfinished, so we didn’t sand those at all. (Hallelujah for that.)
Once sanded, wipe down the chairs with a cloth to remove any dust, then get going with the primer. The articles I read said to do two thin coats of primer. Honestly, we did one semi-thick coat, then just touched up areas once that first coat dried. (Like I said, I’m not the most patient person.)
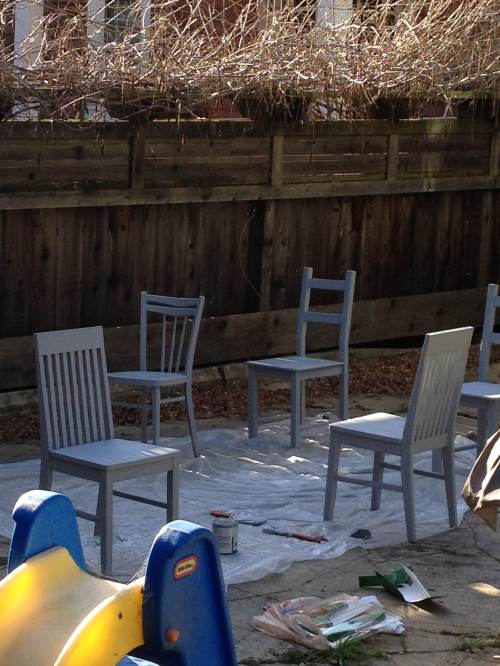 Those are the chairs with the primer on it. It’s actually a really nice color.
 The primer dries in about an hour, but it took us awhile to prime everything (it’s pretty thick and sticky, FYI), so we didn’t paint over the primer right away. Ideally, you’d probably want to let the primer set at least overnight. (Or, y’know, for like two weeks because you’re burned out on this “DIY” project already…)
Once the primer is set, you’re ready to paint. The paint goes on way easier than the primer does, and the coverage is pretty incredible — again, thanks to the primer. Most experienced DIYers say to do two thin coats of paint, or as many as it takes to get to your desired finish. We did one coat + a decent touch-up. (Read: impatient.)
 Kermit-the-frog green, indeed.
The paint took a little longer to dry and set than the primer did. We didn’t sit on the chairs for the first 48 hours after painting.
Now that the actual DIY was done, I got to survey my handiwork in the dining room:
 I felt like it was an improvement from the brown on brown on brown, but also felt like now the room was brown + OMGGREEN!. More work was in order.
I decided to put cushions on the chairs (thanks again, IKEA, for these), and then broached the subject of painting the closet doors white, with KC. Luckily, KC has a hard time saying no to me (and I think fancies himself to be a bit of a DIYer), so he gave in and agreed.
And truth be told, painting closet doors was way easy, compared to sanding and painting chairs, so we had it done in one evening.
Please let me introduce to you, our brand-new dining room:

 Kind of amazing what a few coats of paint can do.
Oh yeah, and what about that cute pup in the corner? A post coming up on her later! 🙂
The white door look great!!
Pingback: Friday Things | Go for 30
Pingback: Bar Cart DIY | Go for 30
Pingback: DIY: updating a table and chairs + a laundry room/living space | Go for 30
Pingback: DIY: Table and Chairs Update | Go for 30
We’re a group of volunteers and starting a new scheme in our
community. Your website offered us with valuable information to
work on. You have done a formidable job and our whole community will be grateful to you.
I am really enjoying the theme/design of your site. Do you ever run into any web
browser compatibility problems? A number of my blog visitors have
complained about my blog not operating correctly in Explorer but looks great in Firefox.
Do you have any advice to help fix this issue?
I’m curious to find out what blog platform you’re using?
I’m experiencing some minor security issues with my latest website
and I would like to find something more risk-free.
Do you have any solutions?
It’s an remarkable piece of writing in favor of all the online users; they
will get benefit from it I am sure.
Good post but I was wanting to know if you could write a litte more on this topic?
I’d be very thankful if you could elaborate a little
bit further. Appreciate it!
I’m now not sure the place you are getting your
information, however good topic. I needs to spend some time studying more
or understanding more. Thank you for wonderful info I
was searching for this information for my mission.
Hi there! This article couldn’t be written much better!
Looking at this post reminds me of my previous roommate!
He constantly kept talking about this. I most certainly will send this article to him.
Fairly certain he’ll have a very good read. Thank you for sharing!
Great blog! Do you have any recommendations for aspiring writers? I’m hoping to start my own blog soon but I’m a little lost on everything. Would you suggest starting with a free platform like WordPress or go for a paid option? There are so many choices out there that I’m totally overwhelmed .. Any tips? Many thanks!|
Fantastic site. Plenty of useful information here.
I am sending it to a few friends ans additionally sharing in delicious.
And obviously, thank you on your effort!
Pingback: Karma, Don’t Fail Me Now | Go for 30