Category Archives: Budget-Friendly Weekend Fun

Budget-Friendly Weekend Fun / Date Night at Home / Dinner / Happy Hour / Savory / Snack / weekend

Date Night at Home Ideas: Dinner, continued

March 25, 2013

I have to admit that one of the things I love about going out to dinner is all the courses you can order.  Generally, I’ll have an ordering strategy before we even make it to the table at a restaurant — one that enables me to try a lot of the dishes on the menu.  (Luckily, KC is generally very amenable to letting me choose what we order.  He’s a keeper, that one.)  Obviously, when you’re having a date night at home, having to prepare all those courses would take up a lot of your precious time that you’d much rather spend gazing at your sweetie.  Or downing another cocktail.

One of the ways to get around the time in the kitchen/I want to eat more than one thing dilemma, is to create an appetizer spread for your date night.  Appetizers are fabulous, because they’re not too big (allowing you to eat a lot of different things without ending up feeling like you’ve swallowed some kind of large sea mammal), and generally don’t require too much prep time.

Here’s a spread I put together for KC’s birthday last year:

appetizer spreadIt may look impressive and time-consuming, but it’s really just three main things.

1. Cheese Board

I always start off with a cheese board, because a. I love cheese, and b. it requires zero cooking.  My general rules for a cheese board are to display 3-4 cheeses + toppings + pickled item(s) + bread/crackers.

Cheese: I like to have at least one soft/creamy cheese (goat or brie, generally), one hard cheese (like an aged gouda or cheddar), one semi-hard cheese (like a comte or emmentaler), and/or one semi-soft cheese (like havarti or jarlsberg).

Toppings: I’ll generally do at least one type of meat (turkey, salami, and prosciutto are my go-to’s), tomatoes, and condiments (I love honey with goat cheese, grainy mustard adds a nice kick to semi-hard cheeses, jam is wonderful with certain types of brie, and TJ’s just started selling quince paste — I couldn’t pass that up!).  Other things like sliced fruit, nuts, and roasted peppers are also nice additions.

Pickled Items: There’s something about pickled things that I automatically associate with a cheese spread.  Also, things that are pickled last forever in the fridge, making them easy to keep on hand.  I almost always have cornichons (I’m obsessed) and green olives laying around; but you can always include other types of olives and/or pickled veggies as well (carrots, mushrooms, peppers, etc.)

2. Veggies and Dip

I like to include a vegetable-centered appetizer, to provide a little relief (and peace of mind) from the cheese + carb happenings which generally dominate my table.  My favorite one to serve is crudite with green goddess dressing.

IMG_1258

Green Goddess Dressing

  • 1/2 cup greek yogurt (I like Fage 2%)
  • 1/2 cup mayonnaise (I use full-fat mayo)
  • juice of 1/2 a lemon
  • 1 anchovy filet or 1/2 tsp anchovy paste
  • 1/2 tsp minced garlic
  • 3 scallions, tops and bottoms removed, then cut into thirds
  • 1 cup packed basil leaves (basically a few handfuls)
  • 1 tsp salt
  • pepper
  1. Using a regular or hand blender, combine all ingredients together, then blend until fully combined and pureed.
  2. Serve with any combination of sliced: carrots, bell pepper, cucumber, snap peas, zucchini, cherry or grape tomatoes, radishes… whatever you can think of.  It’s not great with celery though, just take my word for it.

3. Something Hot

Obviously none of the above requires any real cooking, so I like to include something warm to balance out the room-temp cheese plate and cold veggies + dip.  To make things easy on yourself, you could prepare a hot dip which could be served with the same bread you’re using for the cheese plate (artichoke dip yummmm).  Here I made ricotta crostini with prosciutto.

IMG_2130

Ricotta Crostini with Prosciutto

  • 1 baguette, sliced
  • olive oil
  • salt and pepper
  • 1 tub whole milk ricotta (I think it’s generally 12 or 16 oz)
  • 1 tbsp grated parmesan cheese
  • 1 tsp lemon juice or lemon zest (use zest if you like it more lemony)
  • 1 small bunch mint, finely minced
  • 3/4 cup peas (fresh or frozen, defrosted)
  • prosciutto (thin slices cut into thirds)
  1. Preheat oven to 400°.
  2. Lay out sliced baguette in a single layer on a baking sheet.  Drizzle with olive oil, salt and pepper, turning to coat.  Bake 8-12 minutes, until browned and crispy, turning once halfway through.
  3. While the bread is baking, stir together ricotta, parmesan, lemon juice or zest, mint, and peas, adding salt and pepper to taste.
  4. When bread is done baking, top slices with ricotta mixture, then top with prosciutto.

Budget-Friendly Weekend Fun / Dairy-Free / Date Night at Home / Dinner / Gluten-Free / Savory / Vegetarian

Date Night at Home Ideas: Dinner

March 22, 2013

Part 2: Dinner

Because I’m hungry.

Easy recipes that are just a tad indulgent, but don’t take too long to make.  Let’s eat.

  1. Caramelized Onion Pizza with Goat Cheese and Prosciuttocarmelized onion pizza with goat cheese and prosciutto 2
  2. Copycat Chipotle Burrito BowlsCopycat Chipotle Burrito Bowls
  3. Chili-Rubbed Salmon Tacos with Apple-Cucumber Salsa and Lime Cremataco
  4. Barbeque Chicken PizzaBarbeque Chicken Pizza by Go for 30
  5. Margherita PizzaMagherita Pizza by Go for 30
  6. Spicy Summer Vegetable FlatbreadIMG_4246
  7. Steak and Shrimp with Parsley-Smashed Potatoes and Caesar SaladIMG_3508

Budget-Friendly Weekend Fun / Cocktails / Date Night at Home / Drinks / Gluten-Free / Happy Hour / Sweet / Vegan / Vegetarian

Date Night at Home Ideas: Cocktails

March 21, 2013

Now that I’m sure y’all are gung-ho to have your very own date nights at home, I thought I’d post some recipes and/or links to a few ideas for the various parts of the evening.

Part 1: Cocktails

Let’s get liquored up.

  1. Mixed Citrus Margaritasmarg
  2. Skinny Mojitos: in a highball glass, muddle together the juice of 1/2 a lime + 1 tsp sugar + a few mint leaves.  Add 1 shot vodka (or gin, or rum) and ice.  Top with sparkling water.IMG_2162
  3. The Cuke: in a pitcher, combine and muddle 1 English cucumber, sliced + 3 limes, sliced + juice of 2 limes + 1/2 cup sugar + big bunch of mint.  Add 2 cups gin, then let sit for at least 30 minutes.  When ready to serve, pour over ice and top with sparkling water.IMG_2134
  4. Blended Strawberry Lemonade Margaritas: in a blender, combine 1 3/4 cups lemonade + 1/2 bag frozen strawberries + 1 cup tequila (silver recommended) + juice of 1 lime + small bunch of mint + squeeze of agave (optional).  Blend and serve.IMG_2045
  5. Vodka Lemon Sparkler: to make sparkling lemonade, combine 1 cup freshly-squeezed lemon juice + 1/4 cup sugar + 5 cups sparkling water.  Add 1 shot vodka to a glass with ice, top with lemonade and serve.IMG_1678

Budget-Friendly Weekend Fun / Date Night at Home / Dessert / Dinner / Drinks / Favorite Things / Relationships

Date Night at Home

March 20, 2013

date night 7

I love going out to dinner.  It’s probably one of my most favorite things to do ever, actually.  I love having KC take me out to some fancy joint where you generally have to wait an hour or more for a table (more time for cocktails!)  I mean, I’ll down a $10 cocktail like it’s going out of style, and then spend 2.5 hours lingering over dinner and deciding whether or not I could possibly fit a coffee and dessert into an already-full belly.  (Spoiler alert: I can.)

But, even with only two people eating, that’s quite the pricey evening.  So, what’s a girl to do?  Cancel date night?  Opt for Fresh Choice over Camino?  Nay nay.

Rather than sacrificing romance (or my taste buds), I decided to have date night at home last Friday.  I’m sure I don’t really need to explain what that means, but I’m going to anyway.  Because it’s my blog and I can do what I want on here.

Power!

Our date night was:

A clean house

date night 5Getting dressed up

date night 2Flowers from KC

date nightA homemade meal

carmelized onion pizza with goat cheese and prosciutto 3And fancy boozedate night 6

Surprisingly, staying in was just as fun and romancey as going out usually is.  You should try it!  Here are my tips:

  • Get your place cleaned up (you want to feel like you’re escaping, and not be distracted by the pile of laundry that’s been sitting on the floor since Tuesday)
  • Treat it like you’re going out — get dressed up (really dressed up!  Fancy shoes!  Lipstick!)
  • If you don’t think your honey is going to show up with flowers, ask him to pick up dessert on his way home
  • Put on music, dim the lights
  • Splurge on drinks (you’d spend way more if you were boozing it up at a restaurant, so feel free to get a nice bottle of champagne, spring for the bottle of red you’ve been eying, or get fancy and make your own cocktails)
  • Set the table with your nicest dishes, complete with stemware
  • Make something delicious, but not too time-intensive (you probably won’t feel very romantic if you’re spending 3 hours dicing, chopping, and sweating in the kitchen)

I like to have KC pour drinks and hang out in the kitchen with me while I prep dinner — it’s almost as fun as waiting for a table at the bar, with a cocktail in-hand.  Almost. 😉

Budget-Friendly Weekend Fun / DIY

Dining Room DIY

March 11, 2013

First, let’s get something straight: I’m not crafty.  While I sometimes aspire to be the girl who crafts bunting and giant pom-poms for parties, and knits homemade baby gifts for people’s showers — I’m not.  I don’t even know how to knit.  I can re-sew a button, and that’s it.

I lack patience.  I get frustrated easily.  I don’t love having paint under my nails.  I find threading a needle to be one of the most problematic tasks in the world.  I wasn’t exactly made to be Martha Stewart.

Despite this, right before I started law school, my sister and I inherited two old wooden dressers from our parents, which had been stained and varnished.  (Varnished repeatedly.  Our dad LOVES varnish.)  We decided that we would strip and paint them — a genius idea!  Little did we know, stripping 1000 coats of varnish off of a 30 year old dresser was an absolute nightmare.  And though the dressers eventually got painted and look fine, ever since then, I’ve had zero interest in “DIYing” anything.

Until now.

Some of you may know that KC and I moved into a new place at the end of last year.  And frankly, our little abode is chock-full of charm and adorable details.  However, there was one room that I wasn’t so over-the-moon about — our dining room:

brown dining roomThe walls were a kind of dingy off-white, and the rest of the room was BROWN.  Brown trim, brown floors, brown closet doors, and of course all of our brown furniture found a home in there — our brown bar cabinet, and brown table and chairs.

We bought a new dining room table to better fill the space, but it was also brown.  Not only that, but we didn’t have 6 matching chairs to put around our new purchase, so we had this lovely congregation of unmatched brown wood.

unfinished chairsThat’s our new dining room table + 4 of the unmatched chairs.

After seeing the brown on brown on brown scheme which was the dining room, I had an idea — let’s paint the dining room chairs!  I had 3 pairs of unmatched chairs — I could just paint them all the same color for a shabby-chic vibe and splash of color.  Genius!

I informed KC of my plan.  I believe my actual text to him was: “This is going to be awful, but we’re going to paint the dining room chairs.  Don’t hate me.”  (I think his response was, “Fine.” with an implied SIGH accompanying it.)

So I did some research on how to paint finished furniture.  Surely there had to be a better way than trying to fully strip the chairs and then just painting over them (like Alexis and I did to the aforementioned dressers).  Thanks to the genius that is Pinterest, I was able to find some links to posts written by actual DIYers who had painted over their finished furniture.  Apparently, the primer you use makes all the difference.  (Guess what people?  It’s true.  I’m a total believer.)

Here’s what we used for our project:

The first step is sanding down the finished chairs to rough up the surface so that the primer will adhere to it.  I read competing articles on this — some said to take the finish off the chairs completely, others said to give it a quick once-over just so that the surface isn’t smooth.  Based on our experience, the more finish your piece of furniture has on it, the more you’ll want to sand it down to rough it up.  The Target chairs had the thickest finish, and required the most amount of sanding.  The IKEA chairs were unfinished, so we didn’t sand those at all.  (Hallelujah for that.)

Once sanded, wipe down the chairs with a cloth to remove any dust, then get going with the primer.  The articles I read said to do two thin coats of primer.  Honestly, we did one semi-thick coat, then just touched up areas once that first coat dried.  (Like I said, I’m not the most patient person.)

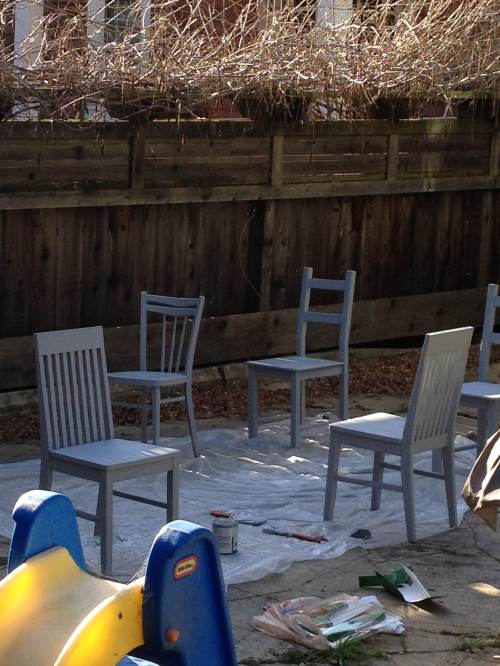
primed chairsThose are the chairs with the primer on it.  It’s actually a really nice color.

primed chairThe primer dries in about an hour, but it took us awhile to prime everything (it’s pretty thick and sticky, FYI), so we didn’t paint over the primer right away.  Ideally, you’d probably want to let the primer set at least overnight.  (Or, y’know, for like two weeks because you’re burned out on this “DIY” project already…)

Once the primer is set, you’re ready to paint.  The paint goes on way easier than the primer does, and the coverage is pretty incredible — again, thanks to the primer.  Most experienced DIYers say to do two thin coats of paint, or as many as it takes to get to your desired finish.  We did one coat + a decent touch-up.  (Read: impatient.)

green chairs outsideKermit-the-frog green, indeed.

The paint took a little longer to dry and set than the primer did.  We didn’t sit on the chairs for the first 48 hours after painting.

Now that the actual DIY was done, I got to survey my handiwork in the dining room:

green chairs insideI felt like it was an improvement from the brown on brown on brown, but also felt like now the room was brown + OMGGREEN!.  More work was in order.

I decided to put cushions on the chairs (thanks again, IKEA, for these), and then broached the subject of painting the closet doors white, with KC.  Luckily, KC has a hard time saying no to me (and I think fancies himself to be a bit of a DIYer), so he gave in and agreed.

And truth be told, painting closet doors was way easy, compared to sanding and painting chairs, so we had it done in one evening.

Please let me introduce to you, our brand-new dining room:

Dining room finisheddining room finished 1Kind of amazing what a few coats of paint can do.

Oh yeah, and what about that cute pup in the corner?  A post coming up on her later! 🙂