Category Archives: Savory

Dairy-Free / Meals for Two / Salads / Savory / Stay Healthy

Warm Brussel Sprout Salad

February 26, 2014

Brussel Sprout baking sheet

Given that it’s a cold, drizzly, gray day, I think it’s the perfect day to post this warm salad.  It’s hearty, filling, and just generally comforting — perfect for winter.  And since it’s got some good-for-you green things in there, you don’t have to fall into a pit of self-hatred after eating it (even if it does taste a little indulgent).

Warm Brussel Sprout Salad

Warm Brussel Sprout Salad

serves 2 as a meal, 4 as a side

  • 1 lb brussel sprouts, trimmed and halved or quartered (depending on size)
  • 1 large yellow onion, quartered and sliced
  • 4 thick slices bread (I used sourdough), cubed
  • 3 thin slices prosciutto, diced (feel free to use bacon or pancetta instead)
  • 1 bag (5oz) lettuce (I used arugula, but baby spinach or baby or mixed greens would also work well)
  • 2 hard boiled eggs, chopped
  • red wine vinegar (you could also use apple cider vinegar here)
  • olive oil
  • salt and pepper
  1. Preheat oven to 400°.
  2. Toss brussel sprouts and onion in olive oil, salt and pepper.  Place in a single layer on a baking sheet and bake until tender, about 20 minutes.
  3. After the brussel sprouts have been cooking for 8 minutes, toss bread cubes with olive oil, salt and pepper.  Add bread and prosciutto to baking sheet (in a single layer), and bake remaining 12 minutes with brussel sprouts and onions.
  4. Place lettuce and chopped eggs into a large salad bowl.  Add cooked brussel sprouts, onion, prosciutto, and croutons, right out of the oven.  Add 1 tbsp red wine vinegar, 1 tbsp olive oil, salt and pepper, then toss to combine.

*Don’t over-dress this salad — it can taste a bit heavy if you’re too heavy-handed with the dressing.

Dairy-Free / Dinner / Gluten-Free / Savory / Soup / Vegan / Vegetarian

Vegetarian Tortilla Soup with Black Beans and Butternut Squash

February 24, 2014

This soup doesn’t need much of an intro from me — it’s crazy easy to make (and quick), and sooo delicious.  It’s smoky, a little spicy, and it will use up an entire butternut squash (which, if you get a CSA box like I do, you probably have like 1,000 of those laying around right now).

Seriously, just take my word on this one and make this soup.

But maybe plan a little bit better than I did and have some ripe avocados on hand…

Vegetarian Tortilla Soup with Black Beans and Butternut Squash

Vegetarian Tortilla Soup with Black Beans and Butternut Squash

serves 3-4

  • 1 small to medium butternut squash, peeled, seeded and diced (about 3 cups)
  • 1/2 head of green cabbage, shredded (about 2 cups)
  • 1 large yellow onion, diced
  • 3 cloves garlic, minced
  • 3 cups vegetable stock
  • 1 can black beans, drained and rinsed
  • 1 1/2 tsp cumin
  • 1 tsp cocoa powder
  • 1/8 tsp (a pinch, really) cayenne pepper
  • 1/2 tsp chili powder
  • salt and pepper
  • olive oil
  • corn tortillas (about 10)

Toppings (all are optional, but they all make this soup especially delicious):

  • crispy tortilla strips
  • minced cilantro
  • crumbled goat cheese (cotija cheese would also work well)
  • greek yogurt or sour cream
  • diced avocado
  • hot sauce (if you’re a spice fiend)
  1. Place a heavy bottomed soup pot over medium-high heat.  Add some olive oil and saute the onion and garlic until just softened and very fragrant.  Add squash, cabbage and vegetable stock (salt and pepper as you go).  Bring to a boil, then lower to a simmer and simmer, covered, for 15-20 minutes, until vegetables are cooked through and tender.
  2. Add black beans and spices, then pass a hand blender through the mix to thicken the broth (the soup should still be very chunky, you’re just looking to break it up a bit to thicken things — a couple passes should do it).  Return to heat and simmer for another 10 minutes, stirring occasionally so the bottom does not burn.
  3. Check for seasoning (add lots of black pepper to this!), then serve with any or all toppings.

Crispy Tortilla Strips

  1. Preheat oven to 375°.
  2. Stack tortillas (I used half a pack — about 10 tortillas) and slice into quarters, then into strips.  Toss strips with olive oil, plenty of salt, and a bit of pepper.  Arrange in a single layer on a baking sheet.
  3. Bake about 15 minutes (check these every couple minutes after 10 minutes — cooking time will vary based on your oven), until just browned and very crispy.

Date Night at Home / Gluten-Free / Salads / Savory / Stay Healthy

Valentine’s Sweetheart Salad

February 18, 2014

I made this salad for Valentine’s Day this year, and it was so delicious and full of purples, pinks, and reds that I just had to share it.  It’s a perfect seasonal recipe also, using produce that’s readily available around this time (grapefruit, avocado, mixed lettuces).

This salad would be perfect for a little date night at home (I’d cut the recipe in half for 2 people — and you’ll have plenty of room for apps and/or dessert), or made to impress someone you’re having over for dinner.

And even though this is quite the fancy-looking affair, this salad comes together in no time flat.  I mean, like 10 minutes.

My kind of dish, for sure.

Valentine's Sweetheart Salad

Valentine’s Sweetheart Salad
because Shrimp and Bleu Cheese Salad with Chicory, Avocado, and Grapefruit with Grapefruit Shallot Vinaigrette was way too long of a name

serves 4

  • 1 bag TJ’s Les Salades du Midi (mix of butter lettuce and radicchio) or one bag/one head butter lettuce
  • 2 heads white and one head red belgian endive, sliced (they come together in a pack at TJ’s)
  • 1 ripe avocado, sliced
  • 1/8 red onion, sliced
  • 2 oz bleu cheese, crumbled
  • 1/2 pound cooked shrimp meat (available at most fish counters)
  • 1 medium to large red grapefruit, segmented, juice reserved*
  • 1 tbsp red wine vinegar
  • 1 tbsp olive oil
  • salt and pepper**
  1. Combine lettuces, avocado, onion, shrimp, bleu cheese, and grapefruit segments in a salad bowl.
  2. For the dressing, whisk together reserved grapefruit juice, red wine vinegar, olive oil, salt and pepper.
  3. Dress and toss to combine.

*To segment a grapefruit, cut the peel off the top and bottom, making flat surfaces on both sides (no pith should remain). Run your knife down the side of the fruit, removing the remaining peel and pith until you’re left with only the center of the fruit.  Cut segments out, running a paring knife between the segments (you’ll see the faint lines in the fruit), until you’ve segmented the whole grapefruit.  Take what remains of the fruit you just segmented, and squeeze the juice into a bowl for the dressing.  Compost the peel and fruit center (once segmented and juiced).

**Make sure to test your dressing for the appropriate amount of salt — this dressing can taste a little flat if it’s lacking salt because you’re using mostly grapefruit juice rather than a heavy-hitting vinegar in it.

Dairy-Free / Date Night at Home / Dinner / Gluten-Free / Meals for Two / Savory / Stay Healthy

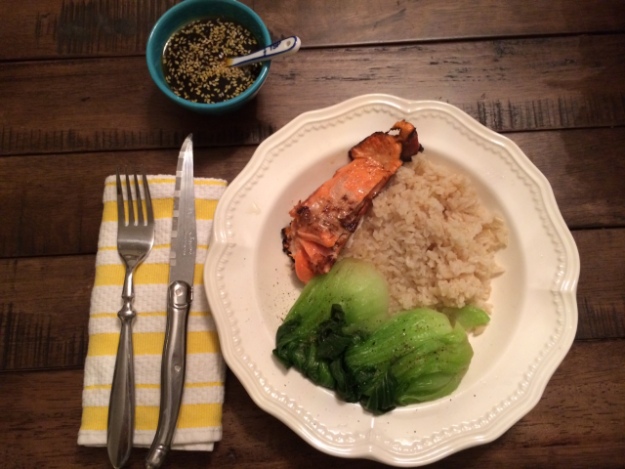
Meal for Two: Hawaiian-Style Salmon (with bok choy and brown rice)

February 3, 2014

In case you’re interested (you probably aren’t, it’s really not that interesting), but this recipe came from: 1. getting some baby bok choy in our CSA box, 2. my love of teriyaki salmon, and 3. a meal I had at Roy’s a few weeks ago.  I mean, did I say interesting or did I say interesting?

I know, completely boring.

Anyhoo, boring or not, this recipe is really easy, but looks like one of those sort of fancier-restaurant style meals.  (Or maybe I just think that since I’m constantly making one-pot or one-bowl meals…)  And, KC was super into this dish, so I think it’s safe to say that it’s pretty dang tasty.

He’s not one to just throw out compliments, y’know.

Also, this would be an awesome meal for a date night at home or a stay-in Valentine’s day.  It makes just the right amount of food, is really flavorful, and a lot of the work (steps 1-3) can be done ahead of time.  Although, even if you don’t do anything ahead, the recipe takes about 40 minutes from start to finish (assuming you’ve soaked your rice — step 1 — ahead of time).

Convinced yet?

(Oh, and in other “interesting” news: I’ve added a few new categories to the blog — “Date Night at Home,” “Cocktails,” and “Meals for Two.”  Blowing your mind right?  Totally.)

Let’s get cooking.

Hawaiian-Style Salmon with Brown Rice, Bok Choy, and Honey-Soy Glaze

Hawaiian-Style Salmon with Honey-Soy Glaze (plus bok choy and brown rice)

serves 2

  • 1/2 pound salmon filet (preferably wild-caught)

For the marinade:

  • 2 tbsp olive oil (or canola oil)
  • 1 tbsp each: rice wine vinegar, soy sauce, brown sugar
  • 1 large clove garlic, minced
  • 1/2 tbsp fresh ginger, peeled and grated

For the honey-soy glaze:

  • 1/4 cup honey
  • 2 tbsp soy sauce
  • 2 tbsp olive or canola oil
  • 1/2 tsp fresh ginger, peeled and grated
  • sesame seeds

Brown Rice:

  • 3/4 cups brown rice (I used brown jasmine rice)
  • 1 1/2 cups water
  • big pinch of salt

Bok Choy:

  • 2 heads baby bok choy, cleaned and cut in half
  • salt and pepper
  • pot with steamer basket
  1. First, place rice in a fine mesh strainer over a bowl.  Cover the rice with water and let soak for at least one hour (preferably longer).  You can do this overnight, or earlier in the day.
  2. Combine all ingredients for the marinade and pour over salmon.  Let marinate for at least 30 minutes.
  3. Whisk together all ingredients for the glaze and set aside.
  4. When you’re ready to cook dinner, drain and rinse the rice, then add it to a saucepan with the 1 1/2 cups water and salt.  Cover and bring to a boil, lower to a simmer and cook for 20 minutes (without removing the lid — no peeking!)
  5. After the rice has come to a boil, bring your steamer pot of water to a boil.  Once boiling, place bok choy into the steamer basket above the boiling water, replace the lid and steam for 5 minutes.  Finish with a sprinkle of salt and pepper.
  6. While you’re waiting for your steaming water to boil, place a skillet over medium heat.  Add some oil to the pan, then cook the fish on both sides until just cooked through and the center is still just slightly raw-pink (about 4-5 minutes per side for 2-inch thick filet).
  7. Divide the fish, bok choy, and rice (you’ll have extra) onto two plates and serve with the honey-soy glaze.

*To make this recipe gluten-free, use Tamari in place of the soy sauce.

Dairy-Free / Dinner / Gluten-Free / Savory / Soup / Stay Healthy / Vegan / Vegetarian

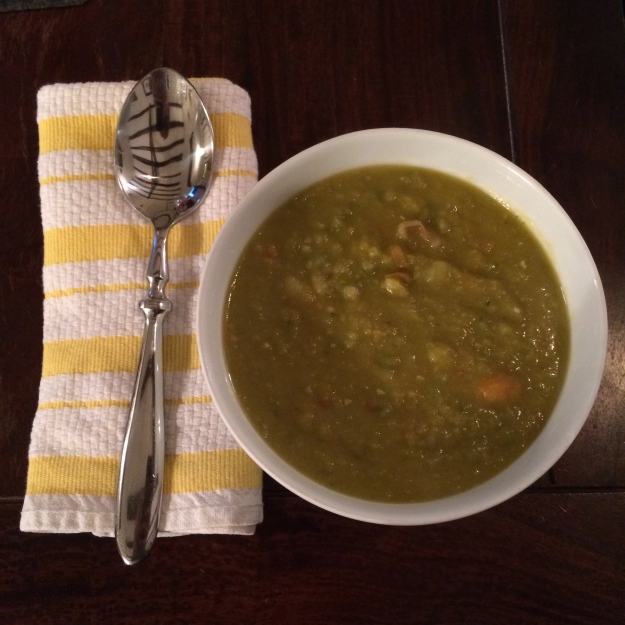
Split Pea Soup

January 28, 2014

Ever since my beloved Bean Cuisine went out of business, I have been searching for a replacement for my favorite soup — the Thick As Fog Split Pea.  I’m happy to report that I think I have found my replacement.  A bit of tweaking on an old Ina Garten recipe, and this soup came to be.

This soup is super delicious (if you’re a split pea fan), and basically couldn’t be easier to make.  In case you need more convincing, here are some other pluses: it’s gluten free, dairy free, and it can be made to be vegan/vegetarian.  Plus, it makes a lot of soup, but not like the “OMG I’m eating the same soup for lunch and dinner for 4 days in a row because it makes 14 gallons” amount.  Because you best believe that KC and I do that on a semi-regular basis…

Winter Minestrone for dayyyysssss.

This recipe makes about 6 bowls; so, if you’re like KC and I, it will last you for 2 dinners and 1 lunch.

Only downside?  Trader Joe’s doesn’t carry split peas.

Rude.

Image

Split Pea Soup

serves 4-6

  • 1 large yellow onion, diced
  • 2-3 cloves garlic, minced
  • 4 medium to large carrots, diced
  • 3 small red potatoes, diced
  • 1 pound dried green split peas, rinsed (these can usually be found with other dried beans in the supermarket)
  • 8 cups chicken or vegetable stock
  • 1/2 tsp dried oregano
  • 1/4 tsp crushed red pepper flakes
  • 1/4 tsp cumin
  • salt and pepper
  • olive oil
  1. In a large stockpot over medium heat, add some olive oil to the bottom of the pan, then add in onions, garlic, spices, salt (start with 1/2 tsp) and pepper.  Saute until softened and very fragrant (5-10 minutes).
  2. Add in the carrots, potatoes, chicken stock, and half of the split peas.  Bring to a boil, then simmer uncovered for 40 minutes.
  3. Add the remaining split peas and continue to simmer for 40 minutes.  Stir occasionally (especially at the end, to keep the bottom from burning).
  4. Add salt and pepper to taste.
  5. Optional: I like my split pea less chunky, so I generally take a whisk to it at the end to help break up some of the bigger chunks of veggies and potatoes.  You could also take a hand blender to it if you like yours really smooth.  Totally not necessary, just personal preference!